Elixir is a functional programming language that promise both scalability and great fault-tolerance. It also provides great tools to support development. But how much does elixir live up to their promise?
In this post, we will create a theoretical chatbot using elixir. The chatbot will read user messages and will be triggered if the message contain url with tracking query in it. Then, the cleaned up url will be sent accordingly.
The reason the project is a theoretical chat bot is to reduce complexity and focus on the basic implementation. Most chat services require bot to be verified before it can read user messages, which also complicates things. For this project I hack together a simple broadcast websocket server. You can take a look at the server implementation here.
While I’m not going to write into too much detail, I’ll outline some important aspects that I’ve encountered while writing this project. Also for context, I’m not entirely unfamiliar with elixir as I’ve used it before at my job. But, it’s the first time I’ve written a complete elixir project from scratch. So, please takes this post with a grain of salt.
You can check the completed project on my github.
There are two ways to install elixir on your system. Either you install elixir through your package manager (e.g. apt, dnf, etc) or use language version manager, in this case asdf.
# clone asdf core
$ git clone https://github.com/asdf-vm/asdf.git ~/.asdf

# add asdf to shell
$ echo '. "$HOME/.asdf/asdf.sh"' >> ~/.bashrc
# or zsh
$ echo '. "$HOME/.asdf/asdf.sh"' >> ~/.zshrc
Because elixir is built on top of erlang, we also need to install erlang. Fortunately asdf also support erlang.
# install erlang
$ asdf plugin add erlang https://github.com/asdf-vm/asdf-erlang.git
$ asdf install erlang latest

# install elixir
$ asdf plugin-add elixir https://github.com/asdf-vm/asdf-elixir.git
$ asdf install elixir latest
Check the elixir version to make sure it’s installed correctly.
$ elixir --version
Take a look at the official documentation for further information.
Personally, I use emacs. Doom emacs specifically. It already comes with support for elixir, with a few configs and tweaks we are ready to go.
;; uncomment this on your .doom.d/init.el config file
(elixir +lsp +tree-sitter)
Refer to the elixir module doom emacs documentation for further read.
The project is an elixir umbrella project consist of 3 applications.
StoragesWebBotFirst, let’s initiate the project.
$ mix new anti_tracking --umbrella
Mix is a build tool to help manage elixir project. It’s installed automatically when we install elixir on our machine.
A directory named anti_tracking will be created.
Inside, we have a Mix project named AntiTracking.
The --umbrella parameter indicates that the generated project will be an umbrella project.
Umbrella project is a term used in elixir for a monorepo project.
Each applications in the umbrella project will share configurations and dependencies.
Check the mix documentation for further details.
Storages application is responsible for handling data.
Similarly, we’re going to use Mix to initiate the application.
$ cd anti_tracking/apps
# create the application
$ mix new storages --sup
The --sup parameter will create a supervised application.
You can refer to the official documentation for details.
The short explanation is that the project will be run in persistent mode and restarted if the child process crashed.
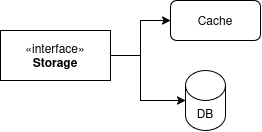
Back to the storages, let’s take a quick look at the application. The main purpose of this application is to serve as source of truth for the whole project. The data itself are web domains and its list of query parameters that known to be a tracker. Those data will be stored in both database (postgresQL) and simple in-memory cache. The application also comes with an interface to query and modify the data.
The cache is a simple genserver with map as the state.
defmodule Storages.Cache do
  use GenServer
  ...

  @impl true
  def init(:ok) do
    {:ok, %{}}
  end

  @impl true
  def handle_call({:lookup, site_name}, _from, cache) do
    case Map.fetch(cache, site_name) do
      {:ok, parameters} -> {:reply, MapSet.to_list(parameters), cache}
      _ -> {:reply, [], cache}
    end
  end

  ...
end
While implementing the cache using genserver might create a bottleneck, the traffic and operation in this module is quite lightweight. In case that this approach is not performed enough, we can substitute this module with a proper cache (e.g. redis) to avoid bottleneck.
The database is an interface to postgresql database through Ecto library. Ecto is an ORM library for elixir that comes with handy tools (even migration included, so cool!) and extensive documentation. Adding the dependencies is quite straightforward.
# Mix.exs
defp deps do
  [
    {:ecto_sql, "~> 3.0"},
    {:postgrex, ">= 0.0.0"}
  ]
end
While I’m not really a fans of ORM, using Ecto is very simple and easy to understand. You can check their getting started documentation yourself.
According to Ecto convention, each table is defined in their own module. Also following that, we will put related functions (e.g. fetching ane updating data) on each table module accordingly.
defmodule Storages.Site do
  use Ecto.Schema
  require Ecto.Query
  import Ecto.Changeset
  import Ecto.Query

  schema "sites" do
    field(:name, :string)
    many_to_many(:parameters, Storages.Parameter, join_through: "site_parameters")
  end

  @spec get_or_insert(String.t()) :: {:error, %Ecto.Changeset{}} | {:ok, integer()}
  def get_or_insert(name) do
  ...
end
Last but not least, the main Storages module.
This module is the interface that will serves logic to handle the data.
defmodule Storages do
  require Logger

  @spec insert(String.t(), [String.t()], {:update_cache, true}) ::
          {:server_error, String.t()} | {:error, String.t()} | :ok
  def insert(site_name, parameter_names, {:update_cache, true}) do
    case insert(site_name, parameter_names) do
      :ok ->
        Storages.Cache.update(site_name, parameter_names)
        :ok
  ...
end
Interaction to the Storages application, be it from another application or interactive shell (more on this later) will be started from this module.
Because we want the application to start (and supervise) both services during startup, they needed to be added to the application children list.
defmodule Storages.Application do
  @moduledoc false

  use Application

  @impl true
  def start(_type, _args) do
    children = [
      Storages.Repo,
      {Storages.Cache, name: Storages.Cache}
    ]

    opts = [strategy: :one_for_one, name: Storages.Supervisor]
    Supervisor.start_link(children, opts)
  end
end
All done for the Storages application.
Now, let’s test this using elixir interactive shell (iex).
$ iex -S mix

iex(1)> Storages.get("google.com")
["utm_params", "utm_sources", "utm_campaign"]
The iex command will execute elixir REPL in the current terminal.
The -S mix argument will tell the iex to start the current mix project and attach the shell to the project.
From the shell, we can execute modules and functions included in the project.
Pretty useful for testing, even more the shell can reload code changes without needed to restart.
iex(1)> recompile()
In my opinion, this is one of the coolest feature of elixir. This make iterating very simple.
Web application will serve as an interface to modify the bot data.
With a simple authentication, the ‘bot admin’ can easily modifying the data without needed to update the database (or cache) directly.
Just like with the Storages, we’re going to create a new supervised application.
$ mix new web --sup
The application itself is pretty simple, it will handle user input through web interface and pass that to our Storages app.
For this application we’re utilizing three libraries:
# Mix.exs
  defp deps do
    [
      {:bandit, "~> 1.0"},
      {:poison, "~> 6.0"},
      {:storages, in_umbrella: true}
    ]
  end
Because the web will call storages application to fetch or modify data, it needs to be added in the dependency list.
Notice that instead of version, we put in_umbrella: true.
This will tell mix that this certain dependency is reside within the same project.
The bandit dependency is already include plug in it. While bandit is responsible for the heavylifting of the webserver, plug will handle and ‘glue’ our application. Let’s talk a bit about plug.
Plug, the heart of this application is so powerful yet so simple. So much that it deserved a writeup on its own. To put it simply, by utilizing Plug we can create a simple webserver and focus on the business logic (akin to Express of nodejs).
defmodule Web do
  use Plug.Router

  plug(:match)
  plug(Plug.Logger)
  plug(:dispatch)

  get "/ping" do
    send_resp(conn, 200, "pong")
  end

  forward("/tracker", to: Web.TrackerRouter)

  match _ do
    send_resp(conn, 404, "not found")
  end
end
You might notice that the module doesn’t follow the elixir standard of function definition. It’s because Plug heavily utilizing macro to make defining path clearer.
On the Web.TrackerRouter module, we handle user inputs.
Including authenticating request, json serialize and deserializing, and function to Storages application invocation.
defmodule Web.TrackerRouter do
  require Logger

  use Plug.Router

  plug(:match)

  import Plug.BasicAuth

  plug(:basic_auth,
    username: Application.compile_env(:web, :username),
    password: Application.compile_env(:web, :password)
  )

  plug(Plug.Parsers, parsers: [:json], json_decoder: Poison)

  plug(:dispatch)

  get "/:site_name" do
    payload =
      %{parameters: Storages.get(site_name)}
      |> Poison.encode!()

    conn
    |> send_json_response(200, payload)
  end

  ...
end
Last, we need to define our child application. But unlike last time, we’re going to add bandit as the child instead of our module directly.
defmodule Web.Application do
  @moduledoc false

  use Application

  @impl true
  def start(_type, _args) do
    children = [
      {Bandit, plug: Web, scheme: :http, port: Application.fetch_env!(:web, :port)}
    ]

    opts = [strategy: :one_for_one, name: Web.Supervisor]
    Supervisor.start_link(children, opts)
  end
end
This is the advantage of using plug (and bandit in this case). Most of the time, we can simply implement plug as we need and all other heavylifting of the web will be handled by the library, neat!
You might notice that in the last 2 code snippet, we have code that seems to fetch environment variable. That isn’t quite accurate as it actually fetching configuration of the current environment. More on that later, but for now all you need to know that those code fetching the value from a configuration file.
Let’s test this, shall we.
$ iex -S mix

[info] Running Web with Bandit 1.6.1 at 0.0.0.0:8080 (http)
Erlang/OTP 26 [erts-14.2.3] [source] [64-bit] [smp:4:4] [ds:4:4:10] [async-threads:1] [jit:ns
Because both applications reside in a same umbrella project, we don’t need to start each application individually. And we can test that the webserver is working by invoking a simple curl.
$ curl localhost:8080/tracker/www.google.com \
   -H "Authorization: Basic aGVsbG86d29ybGQ="

{"parameters":["utm_params", "utm_sources", "utm_campaign"]}%
The bot application is the core of the project. This application will connect to a webserver and handle all received messages. Supposed the message contains known url with tracking parameters, the bot will then send the url with all tracking parameters removed.
We’re using Websockex, an elixir websocket client. The library is choosen due to their API that resembled elixir genserver. Thus, make the application more familiar and easy to work with.
defmodule Bot do
  use WebSockex
  require Logger

  def start_link(opts \\ []) do
    WebSockex.start_link(Keyword.get(opts, :url), __MODULE__, :state, opts)
  end

  @spec cast_message(String.t()) :: :ok
  def cast_message(message) do
    Logger.info("casting message: #{message}")
    WebSockex.cast(__MODULE__, message)
  end

  ...

  def handle_frame({:text, message}, state) do
    Task.Supervisor.start_child(Bot.TaskSupervisor, Bot.MessageHandler, :handle, [message])
    {:ok, state}
  end

  ...
end
The nature of a chat bot requires them to handle big stream of messages. Hence, we’re utilizing task to handle each message. Task is a convenient way to spawn a process in elixir (similar to goroutine of golang). By using task supervisor, we can even retry the task in the event of error or failure. Because each message handled by different process, the main process won’t be blocked and the bot can handle multiple messages ‘concurrently’.
Concurrently in a quote due to the nature of the websocket client library itself. While the message is processed concurrently, sending it back to the server can only be done using a single connection. Making the websocket connection being the bottleneck. And it might be a good thing, because most chat servers has a rate limit. Breaking that and our bot might be timed out or worse getting banned. To prevent that, we might also need to implement rate limiter for message sent. But, because we’re only implementing this for a theoretical chat server, current implementation is sufficient.
defmodule Bot.MessageHandler do
  @spec handle(String.t()) :: nil | :ok
  def handle(message) do
    message
    ...
    |> Enum.map(&cleanup_uri/1)
    ...
    |> send()
  end

  defp cleanup_uri(uri) do
    %URI{host: host, query: query} = uri
    query = URI.decode_query(query)

    cleaned_query =
      Storages.get(host, {:with_cache, true})
      |> Enum.reduce(query, fn item, acc ->
        Map.delete(acc, item)
      end)
    ...
  end

  ...

  defp send(uris) do
    uris
    |> Enum.reduce("Here's your cleaned up urls:", fn item, acc ->
      acc <> "\n - " <> URI.to_string(item)
    end)
    |> Bot.cast_message()
  end
end
The handler implementation itself is quite straightforward. We parse the message, and if it contains a known url with tracking parameters we send it back with the cleaned up url.
defmodule Bot.Application do
  @moduledoc false

  use Application

  @impl true
  def start(_type, _args) do
    children = [
      {Task.Supervisor, name: Bot.TaskSupervisor},
      {Bot, [async: true, name: Bot, url: Application.fetch_env!(:bot, :url)]}
    ]

    opts = [strategy: :one_for_one, name: Bot.Supervisor]
    Supervisor.start_link(children, opts)
  end
end
Same as before, we register our supervised module in our application module. Notice that we also register the task supervisor despite not having the module in the application. It’s due to the nature of the supervisor module, we can simply started it and give it a name. We can also add some options to handle error events, but let’s keep it simple for now.
Everything is done, let’s try out our project.
As we can see, our bot will react to message with known url and tracking parameter. It won’t reply to message without url or url without tracking parameter.
Now, to the last and most important part of the project, deployment.
We need to add some informations to our root mix.exs file before we can start the deployment.
defmodule AntiTracking.MixProject do
  use Mix.Project

  def project do
    [
      apps_path: "apps",
      version: "0.1.0",
      start_permanent: Mix.env() == :prod,
      deps: deps(),
      releases: [
        bot: [
          version: "0.0.1",
          include_executables_for: [:unix],
          applications: [
            web: :permanent,
            storages: :permanent,
            bot: :permanent
          ]
        ]
      ]
    ]
  end
  ...
end
We need to define the applications included in the release. If desired we can define multiple releases with different applications (e.g. release only web application, etc).
You might notice that we set the start_permanent key with comparison to environment and atom :prod.
This key will determine whether to crash the erlang vm when the application supervisor tree shutdown, we don’t want this to happen in development as the stacktraces are important to debugging.
But, what is the environment being referred here?
Let’s take a quick detour.
By default, our mix project is run on :dev environment.
We can set this by passing MIX_ENV variable.
$ MIX_ENV=prod iex -S mix
Mix support three environments out of the box: :dev, :test, and :prod.
Those environments should be self explanatory.
Other than setting various compiler config (debug artifacts, etc), environment also used to set project configuration.
Configuration is a module that used to define project configuration.
Typically, it reside in config/config.exs file.
But it’s configurable through application Mix.exs file in config_path key (for umbrella project, this is defined on each application mix file).
import Config

config :storages, ecto_repos: [Storages.Repo]
import_config "#{config_env()}.exs"
Other than config data for ecto, we can see that the config file will import another config file with current environment as the filename. This enable per environment configuration, pretty helpful for separating configuration for different scenario (e.g. development and testing). For production, it’s a good practice not to commit the configuration value. Instead, configuration values will be defined from environment variables. (In the real word though, usually the production config values are set using more sophisticated way like kubeseal. Which in turn will set the production machine environment variables).
import Config

config :storages, Storages.Repo,
  database: System.get_env("DB_NAME"),
  username: System.get_env("DB_USERNAME"),
  password: System.get_env("DB_PASSWORD"),
  hostname: System.get_env("DB_HOST")

config :web,
  port: System.get_env("WEB_PORT"),
  username: System.get_env("WEB_USERNAME"),
  password: System.get_env("WEB_PASSWORD")

config :bot,
  url: System.get_env("BOT_WS_URL")
There’s a “gotcha” for this approach.
In elixir, by default all configuration value is determine while compiling.
Which mean, if we set configuration values while both compiling and running, the one used will be the one set while compiling.
For configuration that set during runtime, we need to set it on config/runtime.exs instead.
Now we have learn about environment and configuration. Let’s create our first production release for AntiTracking bot.
$ export DB_NAME=antitracking_db
...
$ MIX_ENV=prod mix compile
$ MIX_ENV=prod mix release
Remember, we need to set the environment variables before compiling. Otherwise, configuration values will be empty.
The compiled binary will then available on the _build/prod/rel/bot/bin/ directory with the release name as the binary name (in this case bot).
The binary itself contains set of commands.
$ ./_build/prod/rel/bot/bin/bot
Usage: bot COMMAND [ARGS]

The known commands are:

    start          Starts the system
    start_iex      Starts the system with IEx attached
    daemon         Starts the system as a daemon
    daemon_iex     Starts the system as a daemon with IEx attached
    eval "EXPR"    Executes the given expression on a new, non-booted system
    rpc "EXPR"     Executes the given expression remotely on the running system
    remote         Connects to the running system via a remote shell
    restart        Restarts the running system via a remote command
    stop           Stops the running system via a remote command
    pid            Prints the operating system PID of the running system via a remote command
    version        Prints the release name and version to be booted
We can even start the project as a daemon directly from the binary, cool!
Coming from OO / procedural programming paradigm, learning elixir is quite challenging. I need to “rebuild” my thinking process just to solve a simple problem.
The book “Elixir in Action” by Sasa Juric is pretty good on introducing the language, environment, and guideline to writing elixir. Solving some leetcode / hackerrank problem also helps a lot to give “sense” of the language. The official documentation on hexdocs provides great step-by-step tutorial on creating an elixir project.
I realized that for a first project, this is far more perfect. There are several topics / directions that I want to explore for my next elixir project.
While working on this project is challenging, I’m having so much fun writing elixir. Exploring elixir gives me a fresh feeling compared to my day programming job. But, Elixir as praised as it is, still has its own flaws.
The idiom “there’s no silver bullet solution, just pick the right tool for the right job” stand true even for it. But I think, it’s okay to have your own favourite tool, in my case it might be elixir.
← home